2026年7月11日 星期六

利用LiteLLM Proxy,讓Claude Code調用第三方AI模型

20260710-巴威颱風假

Claude Code原生僅支援Anthropic官方模型,若要調用第三方AI模型(本例為Gemini API),可利用「路由代理工具」,目前主流的開源專案有LiteLLM或claude-code-proxy 專案,這類路由工具會在本機啟動路由伺服器,將Claude Code發出的Anthropic式請求,翻譯成第三方模型的請求格式。本篇將採用LiteLLM執行路由代理。

Windows 安裝命令
d:\                                    安裝於D: 槽
mkdir LiteLLM_proxy                    建立安裝目錄
cd LiteLLM_proxy                       切換到安裝目錄
python -m venv myenv                   建立虛擬環境
myenv\Scripts\activate.bat             啟動虛擬環境(Linux用 source myenv/bin/activate
python -m pip install --upgrade pip    更新 pip
pip install "litellm[proxy]"           安裝 litellm_proxy
litellm --version                      檢查版本,並確認litellm可正常執行
建立CONFIG.yaml(路由設定檔)

建立CONFIG.yaml檔案(檔名可自定),定義如何將Claude模型名稱對應到Google Gemini:

model_list:
  # 當 Claude Code 呼叫 claude-3-5-sonnet 時,實際走 gemini-2.5-pro
  - model_name: claude-sonnet-5
  # 到https://platform.claude.com/docs/en/about-claude/models/overview
  # 查詢精確模型名稱
    litellm_params:
      model: gemini/gemini-3.1-flash-lite
      # 有關gemini api key能用的模型之真正名稱,請到
      # https://aistudio.google.com/app/rate-limit 的Tools區段
      # 尋找RPD欄位不是 0/0 的模型,如果模型名稱右邊有(i)符號者,
      # 請點此符號查看個別模型的名稱。調用模式時需用:[模型主名]-[板本]-[類型]型式,
      # 例如:Gemini 3.1 Flash Lite的調用名稱為 gemini-3.1-flash-lite。
      api_key: "os.environ/GEMINI_API_KEY
      # 可以使用 "os.environ/GEMINI_API_KEY" 由作業系統的環境變數提供>KEY,
      # 亦可直接填入 API KEY,為不同模型指定不同 API KEY
  # 定義呼叫Claude Code的 AI(例如>claude-3-5-haiku)時,   # 要轉發的對象(例如 gemini-2.5-pro)   
- model_name: claude-opus-4-8     litellm_params:       model: gemini/gemini-2.5-pro       api_key: "os.environ/GEMINI_API_KEY"     - model_name: claude-haiku-4-5     litellm_params:       max_tokens: 1500       model: gemini/gemma-4-31b-it       api_key: "os.environ/GEMINI_API_KEY"   general_settings:   user_auth_key_required: false   allow_requests_on_db_unavailale: true  # 即使 db 無法連線,亦傳送請求   litellm_settings:   drop_params: true     # 自動過濾掉 Gemini 不支援的 Anthropic 特有參數   model_alias_map:       # 可讓多個claude-模式對應到同一個gemini模式,以解決相同性問題     claude-haiku-4-5-20251001: gemini/gemini-3.1-flash-lite
router_settings:   fallbacks:             # 設定降級機制     - claude-opus-4-8: [claude-sonnet-5]   # Opus 失敗就降級到 Sonnet   allowed_fails: 3       # 允許模型連續失敗幾次後,將它暫時踢出可用清單   cooldown_time: 30      # 失敗的模型要被暫停多久(見上項)   enable_pre_call_checks: true
#
environment_variables:   # 亦可將環境變數設在此處   # OPENAI_API_KEY: "sk-proj-kq OpenAI API金鑰"   # ANTHROPIC_API_KEY: "sk-ant-ap Claude AI API金鑰"   # GEMINI_API_KEY: "AQ.Ab8 Gemini AI API金鑰" 
為AI模型提供API Key
要調用gemini模型,需要API KEY,有三種途徑可設定:
1. 直接在CONFIG.yaml的個別模型上設定(見上面CONFIG.yaml的註解)
2. 在 CONFIG.yaml的「environment_variables」區段統一設定(見上面CONIG.yaml的「environment_variables」區段,已先註解掉)
3. 使用作業系統的環境變數,上面CONFIG.yaml就是透過作業系統的環境變數提供。
 
Gemini的環境變數是GEMINI_API_KEY,至於設定方式,請依不同作業系統而設定之。
 
設定Claude Code的Base-URL
Claude Code預設連接Anthropic的模式,為了讓Claude Code透過LiteLLM Proxy調用第三方模型,需在作業系統設定下列二個環境變數:
ANTHROPIC_BASE_URL=http://localhost:4000/
CLAUDE_CODE_ENABLE_GATEWAY_MODEL_DISCOVERY=1
啟動LiteLLM Proxy
在Windows的命令提示字元或Powershell終端機執行下列指令:
d:\                                因安裝在 D: 槽,所換到 D:
cd LiteLLM_proxy                  >切換到安裝目錄
myenv\Scripts\activate.bat          啟動虛擬環境(Linux用 source myenv/bin/activate
litellm --config config.yaml

※   可以建立不同的CONFIG.yaml,依不同情境,在執行litellm指定不同CONFIG.yaml。

LiteLLM啟動後畫面如下:
 
  • 工具調用(Tool Use / Function Calling)限制:Claude Code 極度依賴模型執行終端指令(如編譯、讀檔、寫檔)的能力。Gemini 雖然支援 Function Calling,但轉發過程中如果遇到複雜的架構,偶爾可能發生解析錯誤。建議優先使用 Gemini 2.5 Pro 或更高等級的模型來確保 Agent 運作順暢。
  • 無感切換:進入 Claude Code 介面後直接輸入 /model,便可看到轉發而來的 Gemini 模型選項,並自由切換。
啟動claude

完成各環境變數設定,且順利啟動litellm後,litellm會在 http://0.0.0.0:4000/ 接聽請求,接著啟動claude,下圖是claude透過litellm proxy調用gemini的情形。

由litellm的日誌訊息可發現,claude收到的回應來源是claude-sonnet-5,但真正回應此訊息的源頭是gemini-3.1-flash-lite。

2023年10月2日 星期一

以SonarQube掃描Gradle專案源碼

SonarQube 是一套白箱掃描工具,本例使用開源免費的Community版本,有關安裝方式可參考「在KALI Linux建置黑、白箱掃描系統(Arachni及SonarQube)」一文。

本文以SonarQube提供的範例「 sonar-scanning-examples-master\sonarqube-scanner-gradle\gradle-multimodule」做示範說明,置於「C:\sonar-scanning-examples-master\sonarqube-scanner-gradle\gradle-multimodule」目錄下。若想掃描其他gradle專案,請依該專案環境、結構酌作調整,尤其工具及Java版本。

一、必要需求

(一)適合待掃專案的JDK

1.本例使用Java 13,筆者將它放置於C:\JAVA\jdk-13.0.2。

2.建立環境變數「JAVA_HOME」,讓它指向「C:\JAVA\jdk-13.0.2」。

3.在PATH環境變數中加入「%JAVA_HOME%\bin」,讓作業系統可以找到javac.exe。

(二)gradle工具(用來建立 Gradle Wrapper)

1.至Gradle官網 下載Gradle工具包,直接解壓縮到自選目錄,例如「C:\gradle\gradle-8.0.2」。

2.建立環境變數「GRADLE_HOME」,讓它指向「C:\gradle\gradle-8.0.2」。

3.在PATH環境變數中加入「%GRADLE_HOME%\bin」,讓作業系統可以找到gradle.exe。

4.執行 gradle -v 確認gradle.exe可執行。

C:\>gradle -v
------------------------------------------------------------
Gradle 8.0.2
------------------------------------------------------------

Build time:   2023-03-03 16:41:37 UTC
Revision:     7d6581558e226a580d91d399f7dfb9e3095c2b1d

Kotlin:       1.8.10
Groovy:       3.0.13
Ant:          Apache Ant(TM) version 1.10.11 compiled on July 10 2021
JVM:          17.0.2 (Oracle Corporation 17.0.2+8-86)
OS:           Windows 10 10.0 amd64

C:\>

二、修改待掃專案的build. gradle,加入sonar scanner插件:

本例使用4.3.1.3277版插件,這裡可查詢gradle可用的各版本sonar scanner插件,請選擇合適的版本。

plugins {
    ……其他的plugin……
    // 為SonarQue加入適當版本的插件,參考建立Sonar掃描專案後,Sonar所提示的版本
    id 'org.sonarqube' version '4.3.1.3277'
}

三、執行掃描:

(一)啟動SonarQube Scanner Server,假設位於「 http://192.168.232.153:9000」

(二)以瀏覽器連線SonarQube Scanner Server,並建立掃描專案(如重掃描舊專案,請備妥 Project Token)

1. 由Projects頁面選擇「Create Project」->「Manually」

2.社群版只能選擇「Locally」

3.填入「Project display name」(專案名稱)及「Project key」(專案鍵名)

4.產生Project Token(專案身分代號)

5.請記下Project Token


6.選擇要被掃描的專案類型(Gradle)


(三)開啟命令提示字元,將工作目錄切換到待掃描的Gradle專案目錄,本例係位於C:\sonar-scanning-examples-master\sonarqube-scanner-gradle\gradle-multimodule,此範例已自帶「gradle wrapper」。
若您的專案目錄下沒有「gradle\wrapper」目錄,則需要於此專案目錄下執行「gradle wrapper」,完成後,會在此目錄下新增.gradle、gradle兩個目錄及gradlew、gradle.bat兩檔案。
若待掃專案已有.gradle、gradle兩個目錄及gradlew、gradle.bat兩檔案,可跳過此步驟。

(四)注意 gradle\wrapper\目錄裡gradle-wrapper.properties 檔的 distributionUrl 項目所指定之 gradle 版號(可至https://services.gradle.org/distributions/ 查看所有版號),及所使用的JDK版本。
若gradle service版號或JDK版本與待掃專案不匹配,建置過程會發生錯誤。

#Tue May 19 06:55:41 BST 2020
distributionUrl=https\://services.gradle.org/distributions/gradle-6.4.1-all.zip
distributionBase=GRADLE_USER_HOME
distributionPath=wrapper/dists
zipStorePath=wrapper/dists
zipStoreBase=GRADLE_USER_HOME

(五)如果已完成項一及項二的要求,便可直接複製及執行SonarQube所提供的命令。
由於此命令是Linux格式,本例是在Windows環境執行,需調整命令語句,將原始命的整理成單一列。

(六)執行過程如下所示(橘紅色部分是我所執行的命令)

C:\sonar-scanning-examples-master\sonarqube-scanner-gradle\gradle-multimodule>gradlew.bat sonar -Dsonar.projectKey=Example-Gradle-Project -Dsonar.host.url=http://192.168.232.153:9000   -Dsonar.login=sqp_99a6eebeda445bce288e94afae9aa409e7454d75
> Task :sonar
SCM provider autodetection failed. Please use "sonar.scm.provider" to define SCM of your project, or disable the SCM Sensor in the project settings.
BUILD SUCCESSFUL in 39s
2 actionable tasks: 2 executed
<-------------> 0% WAITING
> IDLE 

如果前面各步驟無誤,應該可以完成掃描,最後會看到「BUILD SUCCESSFUL」。如果過程出現錯誤,請仔細研讀訊息,善用Google或ChatGPT找出解答。

完成掃描後,可在SonarQube Scanner Web UI看到專案結果~~


完成掃描後,可在SonarQube Scanner Web UI看到專案結果~~


關於 dotNet Framework 專案的掃描,請參閱:以SonarQube執行.netFramework專案的源碼掃描(白箱掃描)

關於 dotNet Core 專案的掃描,請參閱:以SonarQube掃描dotNet Core專案源碼(白箱掃描)

2023年9月28日 星期四

以 SonarQube 掃描 maven 專案源碼(白箱掃描)

SonarQube 是一套白箱掃描工具,本例使用開源免費的Community版 本,有關安裝方式可參考「在KALI Linux建置黑、白箱掃描系統(Arachni及SonarQube)」

本文以SonarQube提供的範例「 sonar-scanning-examples-master\onarqube-scanner-maven\maven-multilingual 」做示範說明,若想掃描其他maven專案,請依該專案環境、結構酌作調整,尤其工具及Java版本。

一、必要需求

(一)maven

到 Apache Maven Project 下載合適版本的Maven(本例使用 maven-3.9.0),並解壓縮到自選目錄,例如「C:\maven\apache-maven-3.9.0」。

建立環境變數「M2_HOME」指向「C:\maven\apache-maven-3.9.0」。

在 PATH 環境變數中加入「%M2_HOME%\bin」,讓作業系統可以找得到mvn.exe。

(二)適合待掃專案的JDK

本例使用Java 11,位於C:\JAVA\jdk-11.0.2。

二、修改待掃專案的pom.xml,加入sonar scanner:

如果不想修改待掃專案的POM.XML,可參考「三、執行掃描」的第(四)點。

<build>
<pluginManagement>
<plugins>
<plugin>
<groupId>org.apache.maven.plugins</groupId>
<artifactId>maven-compiler-plugin</artifactId>
<version>3.8.1</version>
</plugin>
<!-- 以下為SonarQube而建 -->
<plugin>
<groupId>org.sonarsource.scanner.maven</groupId>
<artifactId>sonar-maven-plugin</artifactId>
<version>3.9.1.2184</version>
</plugin>

這裡可查詢各個版本的sonar scanner插件,請選擇合適的版本,本例是使用 3.9.1.2184。

三、執行掃描:

(一)啟動SonarQube Scanner Server,假設位於「 http://192.168.232.153:9000」

(二)以瀏覽器連線SonarQube Scanner Server,並建立掃描專案(如重掃描舊專案,請備妥 Project Token)

1. 由Projects頁面選擇「Create Project」->「Manually」

2.社群版只能選擇「Locally」

3.填入「Project display name」(專案名稱)及「Project key」(專案鍵名)

4.產生Project Token(專案身份代號)

5.請記下Project Token


6.選擇要被掃描的專案類型(Maven)


(三)開啟命令提示字元,將工作目錄切換到待掃描的Maven專案目錄,本例使用sonar-scanning-examples-master的sonarqube-scanner-msbuild專案做示範,下載後置於C:\sonar-scanning-examples-master\sonarqube-scanner-msbuild。

(四)如果已完成項一及項二的要求,便可直接複製及執行SonarQube所提供的命令。
由於此命令是Linux格式,本例是在Windows環境執行,需調整命令語句,將原始命的整理成單一列:

(五)若想靈活切換SDK版本,可以在開啟命令提示字元後,依續執行:

C:\>set JAVA_HOME=c:\java\jdk-11.0.2
C:\>set path=%JAVA_HOME%\bin;%PATH%                       #加在前面,確保被優先引用
C:\>cd c:\sonar-scanning-examples-master\sonarqube-scanner-msbuild
C:\sonar-scanning-examples-master\sonarqube-scanner-msbuild>
mvn clean verify sonar:sonar -Dsonar.projectKey=Examp-Maven-A -Dsonar.host.url=http://192.168.232.129:9000 -Dsonar.login=sqp_dba30fef39a3676dd2c2bba4ae197d96ae58aa03

   或者

C:\sonar-scanning-examples-master\sonarqube-scanner-msbuild>
mvn clean verify org.sonarsource.scanner.maven:sonar-maven-plugin:3.9.1.2184:sonar -Dsonar.projectKey=Examp-Maven-A -Dsonar.host.url=http://192.168.232.129:9000 -Dsonar.login=sqp_dba30fef39a3676dd2c2bba4ae197d96ae58aa03

(六)執行過程如下所示(橘紅色部分是我所執行的命令)

C:\>java -version
openjdk version "11.0.2" 2019-01-15
OpenJDK Runtime Environment 18.9 (build 11.0.2+9)
OpenJDK 64-Bit Server VM 18.9 (build 11.0.2+9, mixed mode)

C:\>cd sonar-scanning-examples-master\sonarqube-scanner-maven\maven-multimodule
C:\sonar-scanning-examples-master\sonarqube-scanner-maven\maven-multimodule>mvn clean verify org.sonarsource.scanner.maven:sonar-maven-plugin:3.9.1.2184:sonar -Dsonar.projectKey=Examp-Maven-A  -Dsonar.host.url=http://192.168.232.129:9000 -Dsonar.login=sqp_dba30fef39a3676dd2c2bba4ae197d96ae58aa03
[INFO] Scanning for projects...
[INFO] ------------------------------------------------------------------------
[INFO] Reactor Build Order:
[INFO]
[INFO] Example of multi-module Maven project                              [pom]
[INFO] Module 1                                                           [jar]
[INFO] Module 2                                                           [jar]
[INFO] Tests                                                              [jar]

<<部分訊息省略>>


[
INFO] ANALYSIS SUCCESSFUL, you can find the results at: http://192.168.232.129:9000/dashboard?id=Examp-Maven-A
[INFO] Note that you will be able to access the updated dashboard once the server has processed the submitted analysis report
[INFO] More about the report processing at http://192.168.232.129:9000/api/ce/task?id=AYrZSjAxVbRR_GlSxZsf
[INFO] Analysis total time: 7.571 s
[INFO] ------------------------------------------------------------------------
[INFO] Reactor Summary for Example of multi-module Maven project 1.0-SNAPSHOT:
[INFO]
[INFO] Example of multi-module Maven project .............. SUCCESS [  9.495 s]
[INFO] Module 1 ........................................... SUCCESS [  6.353 s]
[INFO] Module 2 ........................................... SUCCESS [  1.566 s]
[INFO] Tests .............................................. SUCCESS [  1.851 s]
[INFO] ------------------------------------------------------------------------
[INFO] BUILD SUCCESS
[INFO] ------------------------------------------------------------------------
[INFO] Total time:  23.218 s
[INFO] Finished at: 2023-09-28T08:57:11+08:00
[INFO] ------------------------------------------------------------------------

C:\sonar-scanning-examples-master\sonarqube-scanner-maven\maven-multimodule>

如果前面各步驟無誤,應該可以完成掃描,最後會看到「EXECUTION SUCCESS」。如果過程出現錯誤,請仔細研讀訊息,善用Google或ChatGPT找出解答。

完成掃描後,可在SonarQube Scanner Web UI看到專案結果~~

完成掃描後,可在SonarQube Scanner Web UI看到專案結果~~


關於 dotNet Framework 專案的掃描,請參閱:以SonarQube執行.netFramework專案的源碼掃描(白箱掃描)

關於 dotNet Core 專案的掃描,請參閱:以SonarQube掃描dotNet Core專案源碼(白箱掃描)

2023年9月26日 星期二

以SonarQube掃描dotNet Core專案源碼(白箱掃描)

SonarQube是一套白箱掃描工具,本例使用開源免費的Community版本,有關安裝方式可參考「在KALI Linux建置黑、白箱掃描系統(Arachni及SonarQube)」

本文以GitHub上的dotNet Core範例「MagicianredLabs/dotnetcore5-example」做示範說明,若想掃描其他 dotNet Core專案,請依該專案環境、結構酌作調整,尤其工具及SDK的版本。

一、必要需求

(一)dotNet SDK

可下載安裝版或ZIP檔,本例選用7.0.201的Amd 64之ZIP版,直接解壓縮到自選目錄:C:\dotNet.core\dotnet-x64-7.0.201,並將此路徑加入 Path 環境變數。

(二)檢查「%USERPROFILE%\.dotnet\tools」目錄裡是否有「dotnet-sonarscanner.exe」檔案及「.store」目錄,如果沒有,請執行下列命令,以安裝 dotNet Core 用的sonarscanner 全域工具:

cd C:\dotNet.core\dotnet-x64-7.0.201
dotnet tool install --global dotnet-sonarscanner --version 5.13.1

備註:可到NUGet查看--version X.X.X可支援的版本

二、執行掃描

(一)啟動SonarQube Scanner Server,假設位於「 http://192.168.232.153:9000」

(二)以瀏覽器連線SonarQube Scanner Server,並建立掃描專案(如重掃描舊專案,請備妥 Project Token)

1. 由Projects頁面選擇「Create Project」->「Manually」

2.社群版只能選擇「Locally」

3.填入「Project display name」(專案名稱)及「Project key」(專案鍵名)

4.產生Project Token(專案身份代號)

5.請記下Project Token


6.選擇要被掃描的專案類型(.NET)

7.選擇.NET的型態(.NET Core)


(三)開啟命令提示字元,將工作目錄切換到待掃描的dotNet Core專案目錄,本例使用MagicianredLabs/dotnetcore5-example裡的it.example.dotnetcore5專案做示範,下載後置於D:\sonar-scanning-examples-master\dotnetcore5-example-main\it.example.dotnetcore5。

(四)如果已完成項一之(二)的要求,就不會理會上圖的第一條命令(dotnet tool install --global dotnet-sonarscanner)。
如已將dotNet SDK的目錄加到PATH環境變數,就逐一複製及執行SonarQube所提供的後三段命令。
若想靈活切換SDK版本,可以在執行掃描命令之前先執行「set PATH=SDKPath;%PATH%」設定路徑(SDKPath請換成dotNet SDK的真正路徑)

(五)執行過程如下所示(橘紅色部分是我所執行的命令)

C:\>set path=C:\dotNet-x64-7.0.201;%path%
C:\>d:
D:\>
cd d:\sonar-scanning-examples-master\dotnetcore5-example-main\it.example.dotnetcore5
D:\sonar-scanning-examples-master\dotnetcore5-example-main\it.example.dotnetcore5>dotnet sonarscanner begin /k:".netFramework-Example.core" /d:sonar.host.url="http://192.168.232.153:9000"  /d:sonar.login="sqp_c855f5d97c43571f467c8757cd5bcd1e9bb8792a"
SonarScanner for MSBuild 5.13.1
Using the .NET Core version of the Scanner for MSBuild
Pre-processing started.
Preparing working directories...
<<部分訊息省略>>

D:\sonar-scanning-examples-master\dotnetcore5-example-main\it.example.dotnetcore5>dotnet build
MSBuild version 17.5.0-preview-23061-01+040e2a90e for .NET
  正在判斷要還原的專案...
<<部分訊息省略>>
  Sonar: (it.example.dotnetcore5.webapi.tests.integration.csproj) Project processed successfully


建置成功。


C:\dotNet-x64-7.0.201\sdk\7.0.201\Sdks\Microsoft.NET.Sdk\targets\Microsoft.NET.EolTargetFrameworks.targets(28,5): warning NETSDK1138: 目標 Framework 'net5.0' 已不受支援,未來將不會再收到任何安全性更新。如需支援原則的詳細資訊,請參閱 https://aka.ms/dotnet-core-support。 [D:\sonar-scanning-examples-master\dotnetcore5-example-main\it.example.dotnetcore5\it.example.dotnetcore5.bl\it.example.dotnetcore5.bl.csproj]
<<部分訊息省略>>

D:\sonar-scanning-examples-master\dotnetcore5-example-main\it.example.dotnetcore5\it.example.dotnetcore5.webapi\Program.cs(12,18): warning S1118: Add a 'protected' constructor or the 'static' keyword to the class declaration. [D:\sonar-scanning-examples-master\dotnetcore5-example-main\it.example.dotnetcore5\it.example.dotnetcore5.webapi\it.example.dotnetcore5.webapi.csproj]
    39 個警告
    0 個錯誤

經過時間 00:01:51.00

D:\sonar-scanning-examples-master\dotnetcore5-example-main\it.example.dotnetcore5>dotnet sonarscanner end /d:sonar.login="sqp_c855f5d97c43571f467c8757cd5bcd1e9bb8792a"
SonarScanner for MSBuild 5.13.1
Using the .NET Core version of the Scanner for MSBuild
Post-processing started.
Calling the SonarScanner CLI...
<<部分訊息省略>>

INFO: More about the report processing at http://192.168.232.153:9000/api/ce/task?id=AYrMzgcpHOOPZyW4SWNL
INFO: Analysis total time: 14.247 s
INFO: ------------------------------------------------------------------------
INFO: EXECUTION SUCCESS
INFO: ------------------------------------------------------------------------
INFO: Total time: 17.470s
INFO: Final Memory: 17M/60M
INFO: ------------------------------------------------------------------------
The SonarScanner CLI has finished
19:34:12.82  Post-processing succeeded.

D:\sonar-scanning-examples-master\dotnetcore5-example-main\it.example.dotnetcore5>

如果前面各步驟無誤,應該可以完成掃描,最後會看到「EXECUTION SUCCESS」。如果過程出現錯誤,請仔細研讀訊息,善用Google或ChatGPT找出解答。

完成掃描後,可在SonarQube Scanner Web UI看到專案結果~~


   關於 dotNet Framework 專案的掃描,請參閱:以SonarQube執行.netFramework專案的源碼掃描(白箱掃描)

2023年9月24日 星期日

以SonarQube執行.netFramework專案的源碼掃描(白箱掃描)

SonarQube是一套白箱掃描工具,本例使用開源免費的Community版本,有關安裝方式可參考「在KALI Linux建置黑、白箱掃描系統(Arachni及SonarQube)」

本文以SonarQube提供的範例「sonar-scanning-examples-master\sonarqube-scanner-msbuild\CSharpProject」做示範說明,若想掃描其他.netFramework專案,請依該專案環境、結構酌作調整,尤其工具及SDK的版本。

一、必要需求

(一)SonarScanner for .NET(本例選用sonar-scanner-msbuild-5.11.0.60783-net46.zip)

(二)MSBuild V14以上(VS Community 2019以上,本例選用VS Community 2022)

(三)符合專案所需的.Net Framework(本例使用VS Community 2022自帶版本)

二、選用需求

將SonarScanner for .NET 執行檔和 MSBuild.EXE 的所在路徑加入 Path 環境變數,若不加入環境變數,執行命令時,必須手動指定完整路徑。

三、各項需求安裝

(一)安裝SonarScanner for .NET:

將所下載的 sonar-scanner-msbuild-5.11.0.60783-net46.zip 解壓縮到自選目錄,例如「C:\sonar-scanner-msbuild-5.11.0.60783-net46」

(二)安裝Visual Studio Community 2022:

1.下載 VisualStudioSetup.exe (VS Community 2022的安裝檔),並執行安裝。

2.安裝過程中,請加選「.NET Framework 4.6.2-4.7.1開發工具」和「.NET Framework 4.8.1開發工具」

四、檢測所需環境

(一)執行「C:\sonar-scanner-msbuild-5.11.0.60783-net46\SonarScanner.MSBuild.exe /?」會看到Sonar-scanner for .net的使用說明。

(二)執行「"C:\Program Files\Microsoft Visual Studio\2022\Community\MSBuild\Current\Bin\amd64\msbuild.exe" /version」會看到Msbuild.exe的版本。

五、執行掃描

(一)啟動SonarQube Scanner Server,假設位於「 http://192.168.232.153:9000」

(二)以瀏覽器連線SonarQube Scanner Server,並建立掃描專案(如重掃描舊專案,請備妥 Project Token)

1. 由Projects頁面選擇「Create Project」->「Manually」

2.社群版只能選擇「Locally」

3.填入「Project display name」(專案名稱)及「Project key」(專案鍵名)

4.產生Project Token(專案身份代號)

5.請記下Project Token

6.選擇要被掃描的專案類型(.NET)

7.選擇.NET的型態(.NET Framework)

(三)複製剛剛建立掃描專案時,SonarQube所提供的三段命令,利用文字編輯器酌作調整,並以「Sonar_net-framework-example.bat」檔名儲存在.netFramework方案目錄下(保有.sln方案檔的目錄,本例為C:\sonar-scanning-examples-master\sonarqube-scanner-msbuild\CSharpProject)

(四)以系統管理員身分開啟命令提示字元,將工作目錄切換到.netFramework方案目錄

(五)直接執行「Sonar_net-framework-example.bat」(執行過程如下)

C:\>cd C:\sonar-scanning-examples-master\sonarqube-scanner-msbuild\CSharpProject
C:\sonar-scanning-examples-master\sonarqube-scanner-msbuild\CSharpProject>Sonar_net-framework-example.bat
SonarScanner for MSBuild 5.11
Using the .NET Framework version of the Scanner for MSBuild
Pre-processing started.
Preparing working directories...
08:56:22.776  Updating build integration targets...
<<部分訊息省略>>

SonarWriteProjectData: 
  Sonar: (SomeConsoleApplicationTest.csproj) Project processed successfully
<<部分訊息省略>>

建置成功。 
"C:\sonar-scanning-examples-master\sonarqube-scanner-msbuild\CSharpProject\SomeConsoleApplication.sln" (Rebuild 目標) (1)
 ->
"C:\sonar-scanning-examples-master\sonarqube-scanner-msbuild\CSharpProject\SomeConsoleApplication\SomeConsoleApplication.csproj" (Rebuild 目標) (2) ->
(CoreCompile 目標) ->
  C:\sonar-scanning-examples-master\sonarqube-scanner-msbuild\CSharpProject\SomeConsoleApplication\Program.cs(4,18): warning S1118: Add a 'protected' constructor or the 'static' keyword to the class declaration. (https://rules.sonarsource.com/csharp/RSPEC-1118) [C:\sonar-scanning-examples-master\sonarqube-scanner-msbuild\CSharpProject\SomeConsoleApplication\SomeConsoleApplication.csproj]
  C:\sonar-scanning-examples-master\sonarqube-scanner-msbuild\CSharpProject\SomeConsoleApplication\Program.cs(21,28): w
arning S3400: Remove this method and declare a constant for this value. (https://rules.sonarsource.com/csharp/RSPEC-3400) [C:\sonar-scanning-examples-master\sonarqube-scanner-msbuild\CSharpProject\SomeConsoleApplication\SomeConsoleApplication.csproj]
  C:\sonar-scanning-examples-master\sonarqube-scanner-msbuild\CSharpProject\SomeConsoleApplication\Program.cs(9,17): warning S2583: Change this condition so that it does not always evaluate to 'true'; some subsequent code is never executed. (https://rules.sonarsource.com/csharp/RSPEC-2583) [C:\sonar-scanning-examples-master\sonarqube-scanner-msbuild\CSharpProject\SomeConsoleApplication\SomeConsoleApplication.csproj]


    3 個警告
    0 個錯誤
經過時間 00:00:20.71
SonarScanner for MSBuild 5.11
Using the .NET Framework version of the Scanner for MSBuild
Post-processing started.
Calling the TFS Processor executable...
The TFS Processor has finished
Calling the SonarScanner CLI...
<<部分訊息省略>>

INFO: ------------------------------------------------------------------------
INFO: EXECUTION SUCCESS
INFO: ------------------------------------------------------------------------
INFO: Total time: 45.588s
INFO: Final Memory: 16M/57M
INFO: ------------------------------------------------------------------------
The SonarScanner CLI has finished
08:57:43.051  Post-processing succeeded.
C:\sonar-scanning-examples-master\sonarqube-scanner-msbuild\CSharpProject>


如果前面各步驟無誤,應該可以完成掃描,最後會看到「EXECUTION SUCCESS」。如果過程出現錯誤,請仔細研讀訊息,善用Google或ChatGPT找出解答。

完成掃描後,可在SonarQube Scanner Web UI看到專案結果~~


    關於 dotNet Core 專案的掃描,請參閱:以SonarQube掃描dotNet Core專案源碼(白箱掃描)

2023年6月25日 星期日

Web Server開啟PUT / DELETE方法,真的危險嗎?

前言

RFC7231是http方法的實作建議文件,在第4節提到:

HTTP was originally designed to be usable as an interface to distributed object systems. The request method was envisioned as applying semantics to a target resource in much the same way as invoking a defined method on an identified object would apply semantics.

(HTTP的原始設計目標是作為分散式物件系統的操作介面,將請求方法當成操作指定物件的方式)。

而RFC7231中共提供八種http方法:

方法 說明
GET 傳送指定的資源(含回應標頭及狀態碼)
HEAD 類似GET,但傳送回應標頭及狀態碼
POST 按請求載荷,處理指定的資源
PUT 以請求載荷取代目標資源的內容(若目標資源不存在,則新增之)
DELETE 移除目標資源的當前內容
CONNECT 就處理的資源,在client和server之間建立連線通道
OPTIONS 指出目標資源可用的通訊選項
TRACE 沿著到達目標資源的路徑,執行訊息環回測試。

對於不會改變資源狀態的方法,被視為「安全」,如GET、HEAD、OPTIONS和TRACE

緣由

收過幾次滲透測試報告,指出:網站開啟OPTIONS、PUT、DELETE等方法(method),會讓駭客上傳後門、木馬,或者刪除重要檔案,屬高風險漏洞,必須關閉。事實真是如此嗎?心中一直存疑。滲透測試人員是否做過驗證程序嗎?還是看到網路上的報導,就人云亦云?會有這樣的見解,或許是因為早期Internet的目標資源是「檔案」形式。但現今,目標資源已衍生出多種形態,原本的不安全論點是否還適用?

從RFC7231的說明:

Unlike distributed objects, the standardized request methods in HTTP are not resource-specific, since uniform interfaces provide for better visibility and reuse in network-based systems [REST].  Once defined, a standardized method ought to have the same semantics when applied to any resource, though each resource determines for itself whether those semantics are implemented or allowed.

(與分散式物件不同,標準的HTTP請求並未限定特定資源,在網路體系(REST)裡,介面的一致性可更好理解和重複使用,儘管各個資源可以自行決定是否實作這些方法的功能或同意執行這些方法,但有了標準化方法,操作任何資源時,就不致於誤解意思。)

上面這段話並「沒有規定PUT/DELETE只用來操作檔案」。

行動

為此,在Git Hub上找到Tomcat源碼,從Tomcat預設DefaultServlet.java發現處理PUT和DELETE方法的邏輯,確實可以上傳及刪除指定的檔案。既然PUT和DELETE的功能可由Tomcat的預設Servlet來定義,表示開發者亦可重新定義這些方法,進而改變PUT和DELETE的處理邏輯,那麼,PUT和DELETE是不是真的不安全?就必要經過實際驗證,因此錄製一段影片,藉由修改PUT和DELETE的程式邏輯,證明PUT和DELETE不像一般滲透測試人員所言那麼地危險!

影片在:https://youtu.be/x85wiKm3JSg

2023年3月5日 星期日

在KALI Linux建置黑、白箱掃描系統(Arachni及SonarQube)

前言

最近因資安教學,需要介紹免費的Web黑、白箱掃描工具,看網路上許多大大推薦arachni(黑箱)及SonarQube(白箱),由於筆者從事滲透測試時,經常使用Kali Linux,加上Kali有完整的第三方環境,便興起於Kali安裝這兩套工具的念頭。

網路上有很多關於arachni和SonarQube的安裝及使用說明,筆者照著做,卻踩了不少坑、撞了許多牆,便藉部落格留下紀錄,以供日後回顧。

壹、Kali環境說明

筆者是從Kali-Org直接下載現成的VMware虛擬機映像檔壓縮檔,下載後解壓縮,然後用VMware workstation Player開啟,可以省掉安裝虛擬的過程,也可簡化教學步驟。

Kali VM預設的帳號和密碼都是「kali」此帳號非系統管理員(root),很多指令必須藉由sudo讓kali暫時以系統管理員角色來執行。

進入Kali後,第一件事是執行系統更新,請開啟一個終端機(或稱主控台),並執行「 sudo apt updage && sudo apt upgrade -y 」(參考下圖)

接著以「 sudo service --status-all | grep post 」查看postgresql是否已啟動,前頭是 [ - ]表示未啟動,是 [ + ]表示已啟動。如果未啟動,請以「 sudo systemctl enable postgresql 」將它設成開機後自動啟動,並以「 sudo systemctl start postgresql 」立即啟動postgressql服務。

確認PostgreSQL啟動後,便可進行後續工作。

貳、設定PostgreSQL資料庫   (參考這篇文章)

arachni和SonarQube都支援PostgreSQL資料庫,而且Kali也已預安裝此資料系統,只須少少步驟設定,便可啟用。

確認PostgreSQL服務啟動後,可參考本段建立所需的資料庫及設定。

sudo passwd postgres               #為postgres 設定新密碼(預設是無密碼)
                              #接著輸入新密碼及再次確認新密碼,
請記住新密碼

su - postgres          #切換成postgres角色的作業環境
密碼:  <輸入postgres的密碼>

createuser  kali       #在PostgreSQL 建立新使用者,可自定使用者名稱

psql                       #進入PostgreSQL 資料庫命令列環境

ALTER USER kali WITH ENCRYPTED password 'kali'; 
          
#為kali設定密碼
          #這裡延用 kali,是為了方便操作,也可以另定密碼,
          #此密碼在OS的kali密碼並不是同一組

CREATE DATABASE sonar WITH ENCODING 'UTF8' OWNER kali TEMPLATE=template0;
          
#為sonar(白箱工具)建立資料庫,名為 sonar,
          # 並將此資料庫擁有者設為kali (上面建立的 kali,不是OS的帳號 kali)

\q                 #離開 PostgreSQL 資料庫命令列環境

exit              #離開PostgreSQL管理環境


叁、安裝arachni   (參考這篇文章)

將 arachni安裝於 /opt 目錄,指令如下:

wget /P /tmp https://github.com/Arachni/arachni/releases/download/v1.6.1.3/arachni-1.6.1.3-0.6.1.1-linux-x86_64.tar.gz        #將arachni下載至 /tmp 目錄

cd /opt          #切換到 /opt 目錄,arachni 將安裝至此

sudo tar -zxvf /tmp/arachni-1.6.1.3-0.6.1.1-linux-x86_64.tar.gz     #將檔案解壓至 /opt

cd arachni-1.6.1.3-0.6.1.1/.system/arachni-ui-web/db/           #切換到arachni的資料庫目錄

chmod 666 production.sqlite3                      # 設定預設使用的sqlite資料庫的讀寫權限

完成安裝後,請以下列命令啟動arachni web伺服器:

cd /opt/arachni-1.6.1.3-0.6.1.1/bin               # 切換到arachni的bin目錄

./arachni_web -o 0.0.0.0 -p 8888                #啟動arachni

          # -o 指定來源網卡,0.0.0.0 表示此機器上的所有網卡
          # 8888 表示連線端口,瀏覽器可以 http://VM-IP:8888 連線。

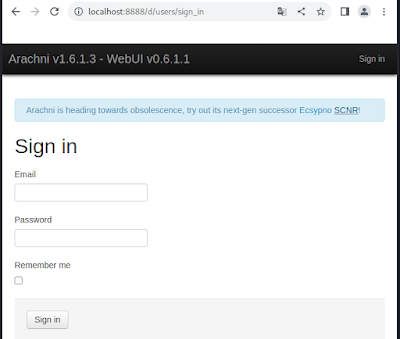
啟動arachni web serve後,從Kali裡的瀏覽器連線http://127.0.0.1:8888,如果出現登入畫面,就表示安裝成功了。arachnii預設的兩組帳密分別是:

admin@admin.admin / administrator
user@user.user / regular_user

看到登入畫面,表示arachni安裝成功

上面的安裝方式是使用arachni自帶的sqllite3資料庫,如果想使用PostgreSQL資料庫來保存arachni執行結果,可按下列步驟調整:

cd /opt/arachni-1.6.1.3-0.6.1.1/.system/arachni-ui-web/config/     #切換到 config 目錄

sudo mv database.yml database.yml.sqlite3                 #備份原來sqlite3的連線組態

sudo mv database.yml.pgsql database.yml                 # 啟用postgresql的連線組態

cat database.yml                                                      #查看連線組態的內容
        #要注意裡頭 username: arachni 及 password: secret 的值

cd ~                                                            #回到kali的家目錄

接著設定arachni的資料庫。假如一開始就打算讓arachni使用PostgreSQL資料庫,可以在步驟貳完成以下的資料庫設置。

su - postgres          #切換成postgres角色的作業環境
密碼:  <輸入postgres的密碼>

createuser  arachni       # 配合database.yml裡的username值,建立新使用者

psql                        #進入PostgreSQL 資料庫命令列環境

ALTER USER arachni WITH ENCRYPTED password 'secret'; 
                   
# 配合database.yml裡的password,為arachni帳號設定密碼

CREATE DATABASE arachni_production WITH ENCODING 'UTF8' OWNER arachni;
                 
#建立arachni_production資料庫,並將擁有者設為arachni

ALTER USER arachni CREATEDB;                         #賦予arachni建立DB的權限

\q                 #離開 PostgreSQL 資料庫命令列環境

exit              #離開PostgreSQL管理環境

完成arachni的資料庫設定後,還需要執行

 cd /opt/arachni-1.6.1.3-0.6.1.1/bin
 ./arachni_web_task db:setup 

來設定arachni_production的資料庫綱要。


肆、安裝SonarQube

這裡有SonarQube的所有下載檔,筆者選用免費的社群版,並安裝於 /opt目錄。

wget -P /tmp https://binaries.sonarsource.com/Distribution/sonarqube/sonarqube-9.9.0.65466.zip                        # 將SonarQube下載到 /tmp 目錄

cd /opt                                     # 將工作目錄切換到 /opt

sudo unzip /tmp/sonarqube-9.9.0.65466.zip         #解壓縮 SonarQube

sudo chown -R kali:kali /opt/sonarqube-9.9.0.65466/*       # 變更sonarqube的權限設定

sudo chmod 777 -R /opt/sonarqube-9.8.0.63668/temp     # #變更temp的權限設定

sudo nano /opt/sonarqube/conf/sonar.properties   #編輯sonar 組態檔

# DATABASE               #有關資料庫連線的設定

sonar.jdbc.username=kali           #帳號,見步驟貳的設定

sonar.jdbc.password=kali            #帳號,見步驟貳的設定

sonar.jdbc.url=jdbc:postgresql://localhost/sonar     #sonar是步驟貳建立的資料庫

# WEB SERVER         #有關Web Server的設定

sonar.web.host=0.0.0.0        #指定可連入的網卡,0.0.0.0表所有IP皆供連線

sonar.web.port=9000           #指定監聽連入的端口

/opt/sonarqube-9.9.0.65466/bin/linux-x86-64/sonar.sh console    #啟動SonarQube

啟動SonarQube伺服器後,由Kali裡的瀏覽器連線http://127.0.0.1:9000,若出現登入畫面,就表示安裝成功了。

看到登入畫面,表示SonarQube安裝成功

至此已完成Arachni及SonarQube安裝,有空再介紹這兩套工具的基本用法。


註:若一切從頭安裝,必須逐一安裝java、PostgreSQL、Ruby,利用現成的Kali VM,將心思專注於arachni及SonarQube的安裝,省卻許多除錯程序,可大大提高成功率。


白箱掃描範例:

掃描dotNet Core專案源碼
掃描.netFramework專案源碼
掃描maven專案源碼